-
STEM
-
Engineer a Peep’s House
You will need:
- 1 pkg. Graham Crackers
- 1 pkg. Edible Easter Grass
- 1 pkg. Peeps Chicks
- 6-8 oz. Wilton Chocolate Melts, pink
- Easter Candy Eggs, chocolate or jelly bean
- *Optional: frosting
Set the materials out. Challenge kids to use only full sheets of crackers or only half sheets. Melt the chocolate for kids according to the package directions. Try using frosting instead of the melting chocolate to see what holds the structure together better.

STEM Potion Experiment
Supplies Needed:
- Chopped red cabbage
- A pan
- Water
- A stove
- Strainer
- Different jugs, jars, and/or beakers
- Vinegar
- Dish soap
To begin, place the chopped red cabbage into a pan, cover with water, and heat until the water turns purple. (Adults will want to help with this step.)
Pour the mixture through a strainer to remove the cabbage and collect the solution in a container. Next, pour the solution into small jars or beakers. Fill them about half way up. Add different amounts of baking soda or vinegar to each one.
Challenge: How many different colors can you make? Want to see a fizzy reaction? Add vinegar to a beaker with baking soda and vice versa! What does this do to the colors?
For the science behind this activity and helpful pictures, visit Science Sparks!!

Dissolving Candy Hearts
You will need:
- Clear cups or jars
- Conversation Candy Hearts
- Variety of Liquids (cooking oil, vinegar, water, milk, juice, rubbing alcohol, or hydrogen peroxide)
- Timer
- Stirrers (optional)
- Printable Dissolving Candy Hearts Science Worksheet
Instructions
Start by adding an equal amount of the chosen liquids to each cup. This can be done in a variety of ways with different temperature water or different liquids. Discuss what you think will happen with each liquid when the candy is added. Grab a timer to see which liquid will dissolve the candy the fastest. Add the candy and write down what happens.
For the science behind this activity and helpful pictures, visit Little Bins for Little Hands!!

-
Arts & Crafts
-
Stained Glass Easter Eggs
You will need:
- black glue (white Elmer’s glue + black acrylic paint)
- clear plastic (from an empty plastic container, a plastic folder or an empty laminated pouch)
- sharpies
- Egg design template
If you are using an egg design template, place it under the piece of plastic. Next, draw your lines on the plastic using the black glue. Let the glue dry for at least 8 hours or overnight for the best results. Once the glue is dry, use sharpies to color in the blank spaces. Then cut the egg shape out and hang them in your window.

<
STEM Potion Experiment
Supplies Needed:
- Chopped red cabbage
- A pan
- Water
- A stove
- Strainer
- Different jugs, jars, and/or beakers
- Vinegar
- Dish soap
To begin, place the chopped red cabbage into a pan, cover with water, and heat until the water turns purple. (Adults will want to help with this step.)
Pour the mixture through a strainer to remove the cabbage and collect the solution in a container. Next, pour the solution into small jars or beakers. Fill them about half way up. Add different amounts of baking soda or vinegar to each one.
Challenge: How many different colors can you make? Want to see a fizzy reaction? Add vinegar to a beaker with baking soda and vice versa! What does this do to the colors?
For the science behind this activity and helpful pictures, visit Science Sparks!!
details>Sugar Cube Ice Palace
Supplies Needed:
- 1 box sugar cubes
- Icy, snowy looking things (We used glass gems
, crinkle paper
, and silver pipe cleaners
and some other stuff from the dollar store.)
- Disney Frozen Elsa and Anna Dolls
- Clear gel school glue
(optional)
There’s not a lot to this project, it’s more about open play. So set up the supplies on a big tray and let them have at it. You can choose to glue the cubes together as the castle is being built, or leave them free to tumble and fall to allow for a new design to be built.
3-D Heart Valentine
You will need:
- our printable heart template (you can find it at the bottom of this tutorial – you need a heart that has a specific shape) – you can also draw the template (more on this in the tutorial)
- pencil
- printer
- red construction paper
- print paper (we used 5 sheets, you can use more or less)
- scissors
- glue
- printer
- ribbon (or yarn)
- drawing materials (crayons, pencils, markers…)
- Optional: yellow paper (or any other color), biodegradable glitter, stickers, sequin…

Directions:
Print and cut out the heart template. Only one heart is needed but more are provided for multiple children to do it at the same time. Fold a sheet of paper in half and then in half again.
Place the heart in the corner of the folded paper with no open flaps and trace it. Cut the heart out leaving the sides intact. The heart should unfold into a flower shape.
Draw or write something on the flower hearts. Fold the flower in half so it looks like a heart on the top and a half on each side. Unfold and tuck the sides in so the flower looks like a heart. Repeat with all other pages.
Apply glue on one side of the heart and press another on top. Continue until all hearts are glued together. Cut a different colored heart to glue to each side. Apply glue to the heart and place ribbon and colorful heart on top leaving extra ribbon from the top. Wrap the ribbon around the bottom and glue on the opposite side along with colorful paper. Cut ribbon leaving enough to tie a bow on the top.
For step-by-step pictures, visit Easy Peasy and Fun!
-
Story Time
-
Happy Easter Little Critter
An Amazing Snowman
Arthur’s Great Big Valentine
-
Family Fun Activity
-
Egg Toss
You will need:
- Either raw or boiled eggs
One person in a team of two starts with an egg. Start at an equal distance apart. Toss the egg to the teammate. If the egg is caught and not broken, move one step back. If the egg is dropped, the team is eliminated. The game goes until all of the teams have dropped or broken their egg.

Burning Ice Experiment
Supplies Needed:
- An ice ball
- Fire-proof bowl (we used a glass container)
- Fire extinguisher
- Safety goggles
- Kitchen lighter
- Rubbing alcohol
**Warning: This project is NOT safe for kids to do alone. Only a parent/adult should conduct the experiment with proper safety gear (goggles, a fire extinguisher) on hand just in case.
The fire can spread and catch unexpectedly. This is a science demonstration only, not something kids should touch.**
Wear safety goggles while doing this and make sure the kids stand well away from the area. Have your fire extinguisher ready.
Place your ice ball inside a fire-proof bowl.
Pour a TINY amount of alcohol onto the ice cube (less than 1/2 a teaspoon). The alcohol will automatically start to melt the ice cube.
Light the alcohol with the kitchen lighter. You have to work quickly or the alcohol will get too watered down before the flame is lit and you’ll have to start over.
The ice will look like it is burning, even though it is just the alcohol on the top burning.
Love Scavenger Hunt
For quick and easy family Valentine’s Day activities, visit Big Family Blessings. Spread the love with a scavenger hunt made for each member of the family.
-
Recipe
-
Hidden Egg Rice Krispies Treat
Ingredients:
- 3tablespoons butter
- 110 ounce bag marshmallows (like Kraft Jet-Puffed)
- 6cups Rice Krispies Cereal
- 8ounces melting chocolate
- 1cup sweetened shredded coconut
- 110 ounce bag Cadbury Mini Eggs
- green food coloring
- Easter sprinkles (optional)
Instructions:
Coat a 9 x 13 baking dish with cooking spray, set aside. In a large microwave safe bowl, melt the butter. Add in the marshmallows and microwave until just softened, about 90 seconds. Stir in the Rice Krispies cereal until combined. Scoop about 1/3rd of the Rice Krispies mixture into the bottom of the baking dish. Use a spatula or damp hands to flatten. Spread the Cadbury Mini Eggs over the Rice Krispies layer, saving a few for garnish. Spread on the remaining Rice Krispies mixture and smooth to flatten.
To prepare topping, microwave the melting chocolate according to package instructions until just melted. Stir in the desired amount of green food coloring. In a separate bowl, toss the shredded coconut with a few drops of green food coloring until the desired shade is reached. Spread the green melted chocolate overtop of the Rice Krispies and then sprinkle on the coconut flakes. Garnish with the remaining Cadbury Mini Eggs, sprinkles, or any other desired toppings.

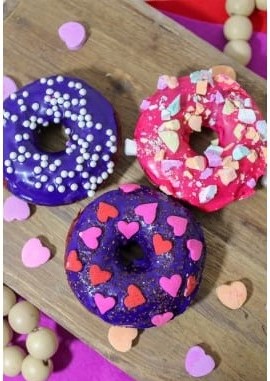
Red Velvet Donuts
Enjoy a red Valentine’s Day breakfast or treat with these red velvet donuts from Because Mom Says.
Ingredients
- 1 cup flour
- 2 tbsp cocoa
- ½ cup brown sugar
- ½ tsp salt
- 1 tsp baking powder
- ½ cup buttermilk
- 2 ½ tbsp butter, melted
- 1 tsp vanilla extract
- 1 egg
- 2 tsp red food coloring (or 1 ½ tsp red velvet flavoring/coloring)
- 2 cups powdered sugar
- 1 tsp vanilla
- Pinch of salt
- 3-4 tbsp milk
- ¼ tsp extract, optional (If you don’t want a flavored glaze, just add ¼ tsp more vanilla)
Instructions
Preheat oven to 350. In a bowl, combine the dry ingredients: flour, cocoa, brown sugar, salt, and baking powder. In a second bowl, combine the wet ingredients: buttermilk, melted butter, vanilla extract and egg. In the dry ingredients, make a well in the middle of the bowl. Pour the wet ingredients into the dry and mix together. Add in the red food coloring or red velvet flavoring/coloring. Grease the donut pan really well! Bake for about 10 minutes or until the tops spring back. Allow to cool completely.
Glaze Instructions:
To make the glaze, in a bowl add powdered sugar and salt. Mix. Add the vanilla, the flavoring extract if you choose, and 2 tbsp milk. Stir. Slowly add 1 tbsp of milk at a tip until you get the consistency that you want. (I added about 3 – 3 ½ tbsp of milk total.) Separate your glaze into smaller bowls and use food coloring to get your desired colors. Dip the tops of the donuts into the glaze. While the glaze is still wet, add sprinkles. Allow to fully set.